Playing with Light and Shadow through Transparent Glazing

Imagine a painter standing before a canvas, staring at a flat, opaque shape that refuses to look three-dimensional. They add a layer of white paint to "fix" it, only to find the shape looks even flatter and more lifeless than before. This is the trap of additive painting—the belief that more pigment equals more detail. Instead, true depth comes from transparency. This post explores how to use transparent glazing to manipulate light and shadow, allowing you to build luminosity through layers rather than hiding it under thick paint.
What is Transparent Glazing in Mixed Media?
Transparent glazing is the process of applying thin, translucent layers of pigment over a dried base layer to alter the color and depth of the underlying surface. Unlike opaque painting, where you cover what is beneath, glazing relies on the light passing through the new layer, hitting the bottom layer, and bouncing back to your eye. This creates an optical mix that looks much more vibrant than if you had just mixed the colors on a palette.
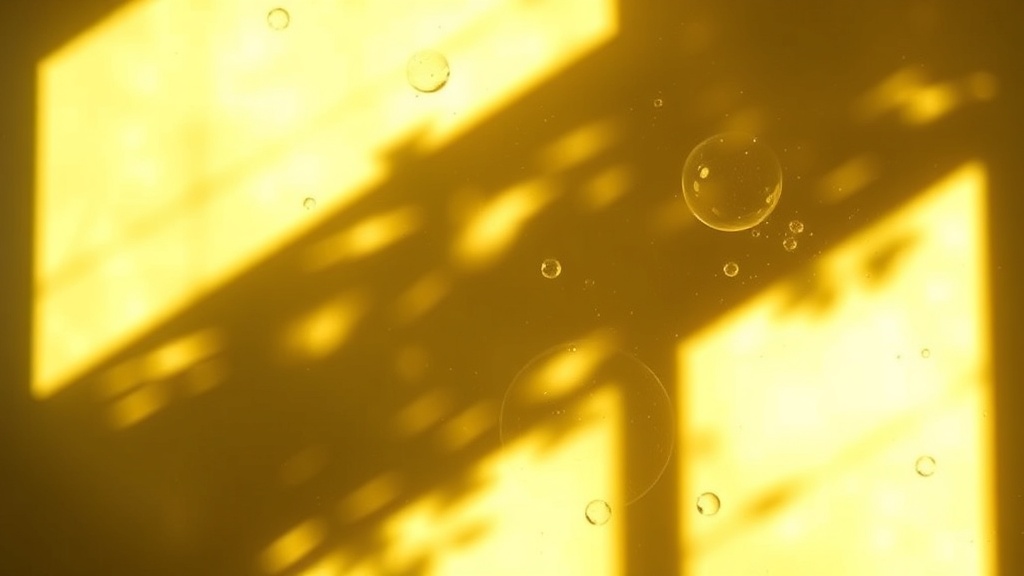
Think of it like looking through colored glass. If you hold a piece of blue glass over a yellow surface, you don't see a flat green; you see a glowing, luminous emerald. In an art journal or on a canvas, this technique allows you to create shadows that feel "inside" the paper rather than just sitting on top of it. It’s a way to build a sense of atmosphere and weight without losing the texture of your previous work.
I often tell my students to stop worrying about getting the "perfect" color right away. If you try to hit the exact shade of a sunset in one go, you'll likely end up frustrated. With glazing, you start with a base and let the subsequent layers do the heavy lifting. It's a slow, intentional way to build a piece—which is great if you're someone who struggles with perfectionism (and let's be honest, who isn't?).
The Tools You'll Need
You don't need a professional studio to do this, but having the right medium is a big help. If you're working with watercolors, you're already halfway there. If you're using acrylics, you'll need a glazing medium to thin out the pigment.
- Transparent Pigments: Look for paints labeled "transparent" or "glazing." Brands like Winsor & Newton or Daniel Smith are wonderful for this.
- Glazing Medium: For acrylics, Golden Artist Colors offers a highly-rated Gloss Gel or Glazing Liquid.
- Brushes: Soft, synthetic brushes work best to avoid leaving brushstrokes in your thin layers.
- Water/Solvent: A clean jar of water for watercolor or a dedicated water container for acrylics.
If you've spent time experimenting with playing with watercolor and ink, you already understand how much a single drop of color can change a surface. Glazing is just a more controlled version of that magic.
How Do I Layer Colors Without Making Mud?
To avoid making "mud," you must ensure that each layer is completely dry and that you are using transparent pigments rather than opaque ones. Mud happens when you mix too many opaque colors together or when you apply a wet layer over a wet layer in a way that disrupts the pigment suspension. If you're working with acrylics, a single brushstroke of a wet color over a drying color will create a mess of broken pigment.
Here is a quick guide to the types of transparency you'll encounter:
| Technique Type | Visual Result | Best For... |
|---|---|---|
| Opaque Layering | Flat, solid color; covers what's underneath. | Blocking in large shapes or fixing mistakes. |
| Glazing | Luminous, glowing; light passes through. | Creating shadows, skin tones, or sunset glows. |
| Scumbling | Broken, textured look; paint sits on top. | Adding texture or "distressing" a surface. |
One thing to watch out for is the "opacity" of your colors. Some colors, like Cadmium Red or certain yellows, are naturally more opaque. If you try to glaze with them, they might behave more like a solid coat of paint. Check the Wikipedia entry on glazing for more technical details on pigment transparency if you want to get nerdy about it.
I've found that the most common mistake is impatience. You'll want to add the next layer because you're excited, but if the base isn't dry, the two colors will blend into a messy, muddy sludge. Wait until it is bone dry. It's a great way to practice that "slow art" mindset we talk about so often.
How Much Light and Shadow Do I Need?
The amount of light and shadow you add depends entirely on your light source, but a good rule of thumb is to use cool colors for shadows and warm colors for highlights. This creates a natural sense of depth that mimics how the human eye perceives light.
When you're building a shadow, don't just reach for black paint. Black often "kills" the color and makes the piece look flat. Instead, try glazing a deep blue or a burnt sienna over your base color. This keeps the shadow feeling alive and dimensional. It's a much more sophisticated way to create depth—and it's much more forgiving if you make a mistake.
If you find yourself getting stuck in the "ugly middle" of a piece, remember that the shadow layer is often where the piece starts to look "real." It can be intimidating to add those dark, transparent layers, but they are what give your art its soul. If you've struggled with making your art feel flat, this is your solution.
You might want to look back at making peace with messy layers if you're feeling hesitant about the unpredictability of these transparent layers. The beauty is in the layering process itself, not just the final result.
Step-by-Step Glazing Workflow
- The Underpainting: Paint your basic shapes using opaque colors. This is your "map."
- The Dry-Down: Wait. I mean really wait. The layer must be dry to the touch.
- The First Glaze: Mix a tiny amount of pigment with your medium (water or glazing liquid). Apply it thinly over a specific area.
- The Evaluation: Step back. Does it look too dark? Too much? It's okay to adjust.
- The Shadow Layer: Apply a second, darker transparent layer to the areas where the light wouldn't reach.
- The Highlight: Use a very thin, light glaze (like a pale yellow or white) to bring the light back to the high points.
The catch? You can't go back easily once you've applied a dark glaze. You can't "un-glaze" a shadow easily. But that's the fun of it! If it goes wrong, you can always paint over it with an opaque layer and start the glazing process again. It's all part of the messy, beautiful process of learning.
Don't be afraid to be a bit "ugly" with your first few attempts. Your first few glazes might look a bit muddy or uneven. That's fine. You're learning the relationship between pigment and light. The more you play with it, the more intuitive it becomes. Grab your brushes and just see what happens.
Steps
- 1
Prepare a dry base layer
- 2
Mix a highly diluted wash
- 3
Apply the new color over the dry layer
- 4
Repeat for desired depth