Ink and Iron: Exploring Rust and Oxidation in Mixed Media

A piece of scrap iron sits in a shallow tray of white vinegar, its surface beginning to bubble and darken as the acid reacts with the metal. Beside it, a weathered copper penny undergoes a transformation, turning from a bright penny-orange to a crusty, sea-foam green. This isn't just decay; it is a controlled chemical reaction that provides a depth of texture and color that no synthetic pigment can truly replicate. In mixed media, oxidation is a way to invite the natural world into your sketchbook, allowing the passage of time to become a literal layer of your art.
The concept of "ugly" art often stems from a fear of losing control. When we work with oxidation, we are intentionally relinquishing that control to chemistry. We are making a pact with the elements—oxygen, moisture, and acidity—to finish the work for us. This process requires a shift in mindset from being a perfectionist to being a collaborator with nature.
The Chemistry of Color: Understanding the Reactions
To use oxidation effectively, you must understand what is happening at a molecular level. Oxidation occurs when a metal reacts with oxygen, often accelerated by an electrolyte or an acid. In the studio, we use specific agents to trigger these changes in a controlled manner. Each metal carries its own distinct "personality" and color palette.
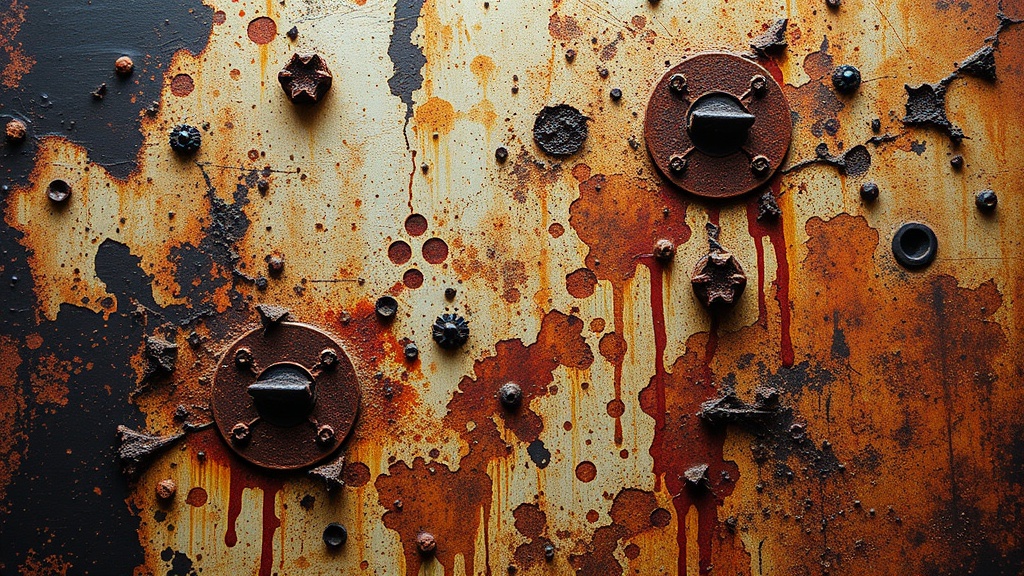
Iron and Steel: The Warmth of Rust
Iron is the most common medium for creating organic, gritty textures. When iron is exposed to moisture and oxygen, it produces iron oxide, commonly known as rust. The colors range from bright, fiery oranges to deep, burnt umbers and even purples. To achieve this in a journal, you can use iron filings, steel wool, or even rusted nails. A common technique involves saturating a piece of heavy-duty watercolor paper with a mixture of water and a small amount of salt, then sprinkling iron filings over the wet surface. As the salt draws the moisture, the iron begins to oxidize, creating a mottled, organic pattern that feels ancient and grounded.
Copper and Brass: The Verdigris Effect
Copper offers a completely different aesthetic. While iron feels heavy and earthbound, copper feels ethereal and weathered, much like an old statue in a public park. The hallmark of copper oxidation is verdigris—that striking turquoise or sea-foam green patina. You can achieve this by using copper leaf or even crushed copper wire. To trigger the reaction, a solution of white vinegar and salt is often used. This reaction is more delicate than iron rust and produces a much more luminous, translucent color profile that sits beautifully atop layers of matte acrylic paint.
Bronze and Patinas: Deep Tones and Antiquity
Bronze and brass-toned pigments provide a way to add a sense of "weight" to your mixed media pieces. While these are harder to oxidize directly on paper without specialized metallic foils, you can simulate the effect using metallic acrylics combined with chemical aging agents. This creates a sense of history, making a modern journal page feel like a discovered artifact.
Essential Tools and Materials for Oxidized Art
Before you begin, ensure your workspace is well-ventilated and that you are working on a surface that can handle moisture. Oxidation is a messy, wet process that requires patience. You might find it helpful to review our guide on creating immersive gesso reliefs, as building a thick, structural base is often necessary to support the weight of metal-infused layers.
- Metal Elements: Steel wool (Grade 000 is best for fine texture), iron filings, copper leaf, or crushed brass shavings.
- Acids and Electrolytes: White distilled vinegar, lemon juice, or a highly concentrated saltwater solution.
- Substrates: Heavyweight mixed media paper (at least 300gsm), wood panels, or heavy-duty watercolor paper. Thin paper will warp and disintegrate.
- Sealers: Matte acrylic medium or spray fixative to stop the reaction once you are satisfied.
- Safety Gear: Gloves and a mask. When working with fine metal dust or strong acids, protecting your skin and lungs is non-negotiable.
A Step-by-Step Process: Creating a Rust-Infused Layer
This technique creates a "rust print" on your paper, resulting in a texture that is both incredibly tactile and visually complex. It is a perfect exercise in embracing the unpredictable.
- Prepare the Base: Apply a thick layer of gesso or heavy-body acrylic to your paper. This provides a "cushion" so the acid doesn't immediately eat through your substrate. Let this dry completely.
- Distribute the Metal: Sprinkle your iron filings or small pieces of steel wool across the surface. You can create a dense cluster in one area to create a focal point, or a sparse, scattered pattern for a more subtle effect.
- Introduce the Catalyst: Using a dropper or a small spray bottle, apply a mixture of 50% white vinegar and 50% water over the metal. Watch as the liquid hits the metal; you may see tiny bubbles or a slight color change almost immediately.
- The Waiting Period: This is the hardest part. Depending on the humidity in your room, this can take anywhere from two hours to two days. Do not move the paper during this time. If the paper begins to dry too quickly, you can lightly mist it with more vinegar solution to keep the reaction active.
- Removal and Sealing: Once the color has reached your desired intensity, use a stiff-bristled brush or a small spatula to lift the metal filings away. The "ghost" of the metal will remain as a textured, stained imprint. Immediately seal the area with a matte acrylic medium to stop the oxidation process.
Integrating Oxidation into Larger Compositions
Oxidation shouldn't exist in a vacuum. To make these textures work within a full mixed-media piece, you need to balance the "chaos" of the rust with more controlled elements. If every inch of your page is rusted, the eye has nowhere to rest.
Try using the oxidized area as a background layer. Once the rust is sealed, you can paint over it with translucent glazes of transparent watercolor or watered-down acrylics. This allows the texture to peek through while adding a new color dimension. For example, a wash of deep indigo over a rust-stained background creates a stunning, moody contrast that mimics the look of weathered ship hulls or old industrial machinery.
Another way to integrate these textures is through collage. Instead of oxidizing the paper itself, you can create "oxidized scraps." Create several small sheets of paper using the iron and vinegar method, let them dry, and then cut them into organic shapes. These can then be layered into your journal alongside other found materials. For more ideas on layering textures, see our post on building dimension with found ephemera.
Embracing the "Ugly" and the Unpredictable
The most important rule of working with oxidation is this: The reaction is the teacher. There will be times when the vinegar eats too deeply into the paper, leaving a hole where you didn't want one. There will be times when the copper turns a muddy brown instead of a vibrant green.
When these "mistakes" happen, do not reach for the white-out or the heavy opaque paint to hide them. Instead, lean into the imperfection. A hole in the paper can become a window to a lower layer of color. A muddy stain can become a shadow that adds depth to a sculptural element. In the world of oxidation, there is no such thing as a mistake—only a new direction the chemistry has chosen to take.
By practicing these techniques, you are training your eye to see beauty in decay and value in the unexpected. You are moving away from the rigid structures of "perfect" art and moving toward a more honest, visceral way of making. Let the rust happen. Let the copper turn. Let the art be as messy and transformative as the process itself.